Make It Snow With Photoshop Brushes
2020年7月9日

Today, I’ll show you how to make snow fall easily in Photoshop.
First, prepare an image and choose a brush with 0% brush hardness from the Brush Tool.
Then choose choose to switch the brush panel.
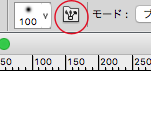
When you select it, a window will appear and you can make snow there.
First, set the [Spacing] to 90% – 110%.
![Set the [Spacing] to 90% - 110%.](https://soft-no-sosa.com/wp/wp-content/uploads/2019/04/a657707c0ed4a66a9cb70e43da337e45.png)
Next, check the [Shape Dynamics] and [Scattering] boxes.
![Check the [Shape Dynamics] and [Scattering] boxes.](https://soft-no-sosa.com/wp/wp-content/uploads/2019/04/1e09958ea2240fbaf0d5e7d06ba57a9d.png)
Adjust the value of [Scatter] and [Count] in [Scattering].
The maximum value for [Scatter] is better because it allows you to spray a wider area.
![Adjust the value of [Scatter] and [Count] in [Scattering]. The maximum value for [Scatter] is better because it allows you to spray a wider area.](https://soft-no-sosa.com/wp/wp-content/uploads/2019/04/3432db69df49270babe9102b9154ccc7.png)
Then check [Other Dynamics] and adjust the Opacity jitter.
It makes the snow look more fluffy.
![Finally, click [Other Dynamics] and [Smoothing] to adjust the other opacity.](https://soft-no-sosa.com/wp/wp-content/uploads/2019/04/c8f6f133034408e0662ec17ffc3695e9.png)
Finally, check the [Smoothing] and the brush is done.
Set the brush color to white and let it snow.

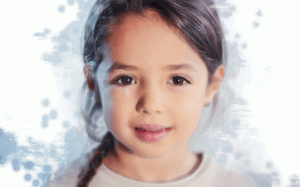
After that, select [Filter] > [Blur] > [Blur (Gaussian)] and blur it a bit.
![After making it snow, select [Filter] class=](https://soft-no-sosa.com/wp/wp-content/uploads/2019/04/24deee2671b556209459f8cff7b5990b.png)
This effect can make out-of-season snow and make the other seasons winter, so give it a try!

関連記事
-
 Correct Image Distortion in Photoshop
 -
Photoshop Lighting Effects
-
How to Enlarge Pixel Art Without Blurring
-
Adding Outlines to Images
-
How to place an image in text with Masks in Photoshop
-
How to create an animated GIF in Photoshop
-
Correct an Image Distortion with the Adaptive Wide Angle Filter
-
How to Create a Watercolor Painting Effect in Photoshop